
I stated in my April 4th post "7AM-Bridge Street Chatham" I was planning on posting some images I shot during the process of completing this pastel painting. I'm going to explain my process and share some of my thoughts during each step of the painting. The description of each step will be below the image. Enjoy the post...it's going to be a long one!

I first started out back in January with a 16x20 piece of Kitty Wallace Sanded paper mounted on gator foam, giving me a solid, rigid surface to paint on. I used a selection of Terry Ludwig pastels to make this painting come to life.
I started by lightly sketching the layout of my subject...the perspective and scale is key to this painting so I wanted to make sure I had everything in the right place. I really wanted to to a nice Amber colored under painting with this painting, but I guess I got lazy and just sort of blocked in quickly with my local color. Trying to focus on some of the darker values and colors I see right from the beginning.

I really started to focus on the sky here. In my opinion it was essential that I get the sky in a good place before I start putting in my clouds. I began to layer and layer colors into the sky...purples, greens, pinks...I did the same with the driveway under the boat. I wanted it to have more life than just blacktop so I gave it some nice maroons and oranges to give it a bit more life. I tried to stay really dark at this time also. Since the boat is one of the primary focal points, I started to layer the color on that area, not really focusing on form at this time. I haven't spent much time on the boat house at this time either.

I really picked up the pace a bit here...started to focus on the form of the boat, really pile the blues on the sky and started to give the boat house a little life.

Now that I felt the sky was in a good place, I began to quickly block in the clouds. I stayed a little lighter than I probably should have, but I was really just going for shape at this time. The perspective is key here also...the clouds really show movement and give the composition depth and capturing the angle was essential.
I really went dark on the boat and other areas to get the rest of the painting to the same place. I over did it on the ground, at this point I lost a lot of the nice color I gave the hot top. My values on the house are not correct at this time, but for me I needed to see things a certain way before I moved on.
Very pleased at this stage.

In this picture I only focused on the clouds. I set out to make them fluffy and give them the right color. If the color was not right I don't feel I would give you the early morning feeling that captured me so deeply when I photographed this landscape.
I went a little heavier on the three bottom clouds than I wanted to. I ended up darkening them up quite a bit. I really set out to make them feel far off in the distance...not sure if I accomplished it or not. I have notoriously struggled with clouds so I was very happy at where these were.
At this time I also began to go back and fourth with the sky colors again. That was very, very challenging because I'm a very messy painter...I had my pastels everywhere and quite honestly I couldn't for the life of me remember what pastels I used where, so the sky color got quite a few unexpected color additions at I moved forward.
OK, this is were it really started to breathe...The clouds were pretty much done at this point. I needed to warm them up a bit, so I began to add some creamy whites, some yellows and I also started to darken up the sky directly above the boat house too. I think I needed to get back some of the dark I lost to bring back some of the depth.
As you can see I really got into some of the details and really bring the form together on different parts of the painting.
I began to darken up the right side of the boat house. I wanted that to be an afterthought and did not want it to take your eye out of the painting. I focused on the shadow of the boat on the house and really tried to boost the amazing orange glow on the house. I focused shape of the shadow and the amazing reflection in the window also. I lightened up the color of the house and felt that was at a good place at this time so off to the boat! I added the white pinstripe, punched up the oranges and ambers, while keeping the glossy black color of the top of the hull. I focused on giving the bottom of the boat shape and inserted the stilts the boat was resting on.

Now the fun begins...I can't believe I didn't attempt to put the mast ropes in earlier regardless of what stage the painting was in...I added the crossbar you could see in the last image, but now adding the ropes was challenging and fun! I wanted them to have form and I wanted them to reflect the same orange light the rest of the subject was capturing. This is where the Terry Ludwig pastel is a HUGE help! Just pressing the corner of the pastel and following the angle down, varying pressure in different spots is what gives the ropes life and form even in the smallest, thinnest scale. I couldn't wait to do that. I was happy with the results. One of the ropes I had to fix...LOL the angle was WAAAYYY off!

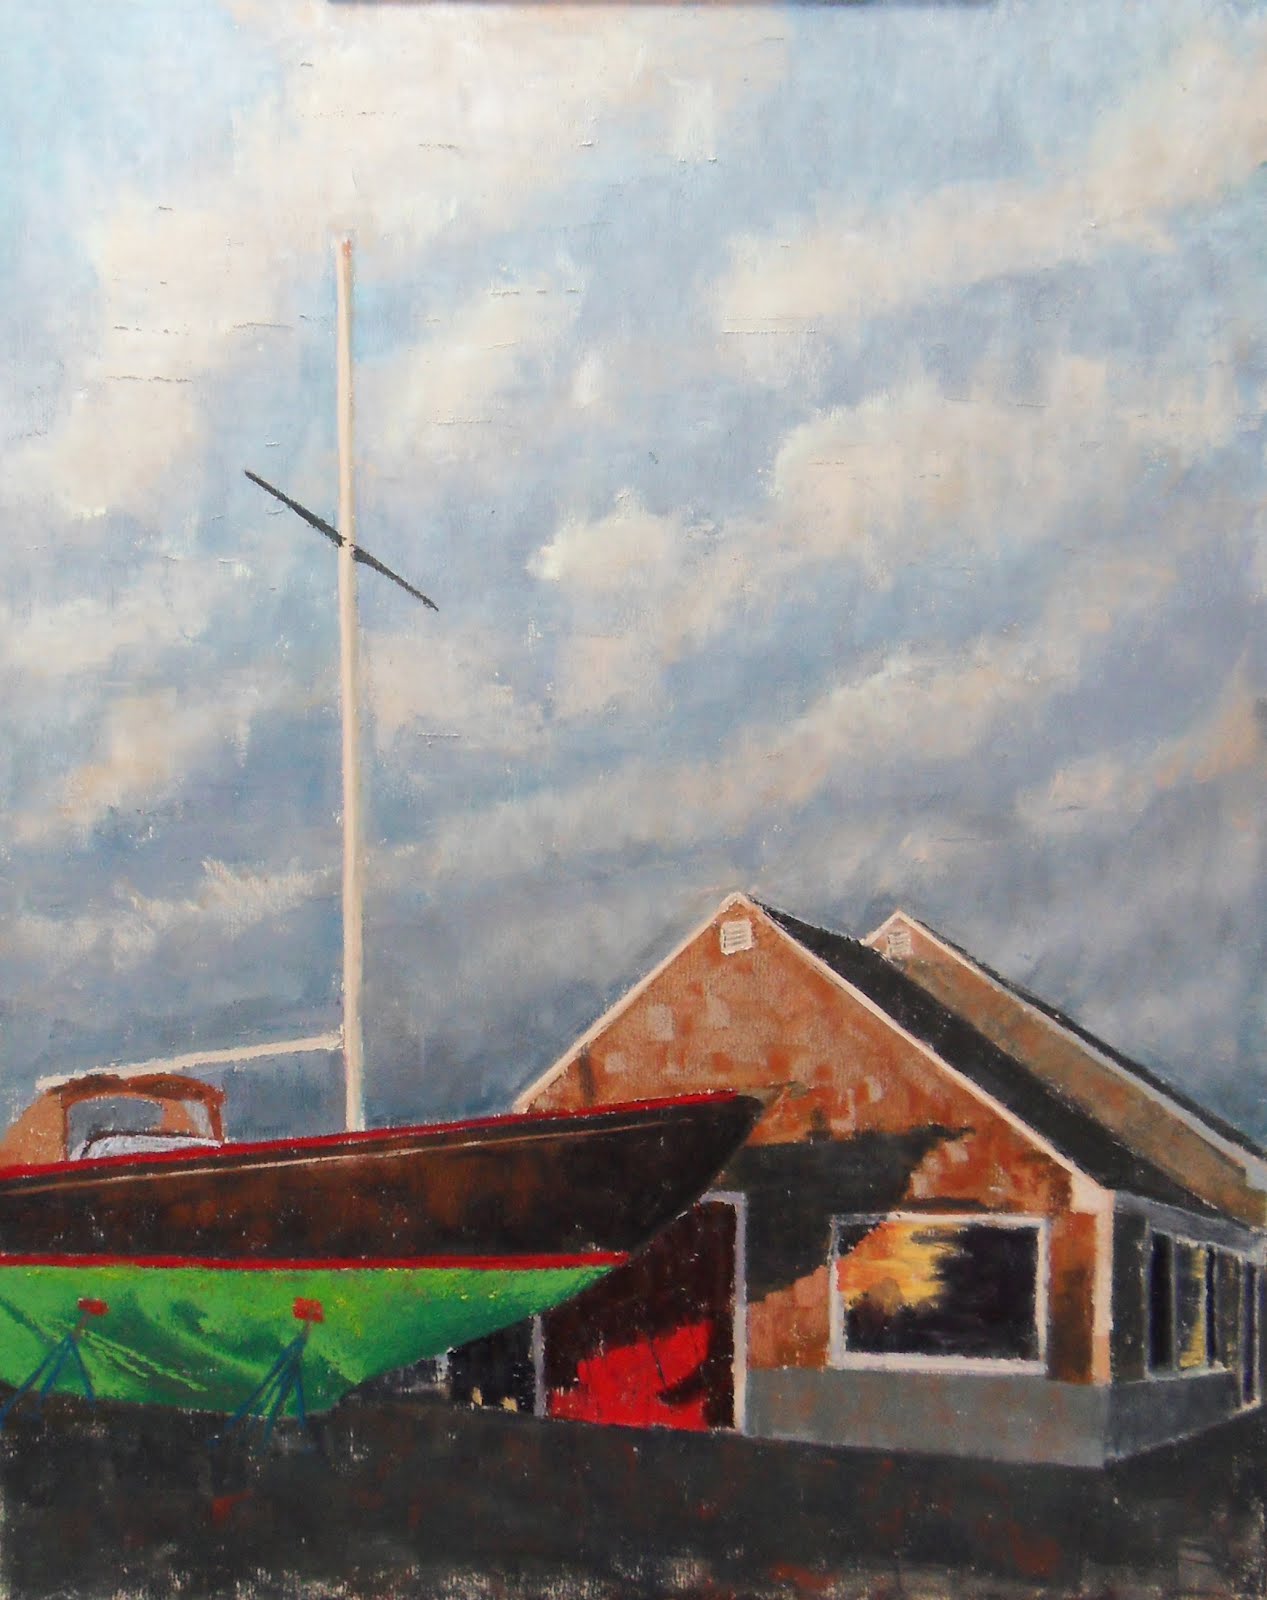
In the final step, I lightened up the color of the hot top, added the line to lead you in a bit, lightened up the boat, fixed a little smudge in the orange window reflection...VOILA!
I hope you like the painting and enjoyed the post. I would love to hear your thoughts. Thanks for reading!
Very interesting to read through your process!
ReplyDeleteGlad you enjoyed it. Writing the post was fun! Not as fun as painting, but fun!
ReplyDeletehopefully you approve ;-)